The Muckian Maneuver --
I call this the Muckian Maneuver, named after a retoucher in Dallas, Texas in late 1990's who invented this Photoshop technique. Mr. Muck never shared it with anyone but fortunatly a co-worker named David Wilson "backwards engineered" the method which only goes to prove that once you know something can be done, it simply takes time and effort to discover how its done.
The technique is very simple and effective. Simply open a color image you want to neutralize, convert it to grayscale and then convert it back to CMYK. (Some people copy the color image into a new channel, copy the channel and paste into the color image. Same thing.)
The result is a perfectly neutral image within the color space you pasted into. For instance, if you were using U.S. Web Coated (SWOP) under the CMYK settings in Photoshop, then the image will print neutral provided you were running to an American web press with appropriate #5 groundwood paper, and the press was in good shape. If you were using SNAP 2007, U.S. Sheetfed, then you could expect the same neutral result provided the image was being printed in SNAP or a Sheetfed press respectively. This concept is at the heart of every color managed system ever created.
The Muckian Maneuver is great, and I use it regularly, however, sometimes I want to guarantee that no matter what, the image will not print off-neutral. However, I have to sacrifice the depth of blacks to create this effect. This is often a satisfactory exchange, but you can be the judge of this.
The Richard Free Technique --
Richard Free is a long-time retoucher in Guilford, Connecticut who invented this technique. It's quite brilliant though it requires an understanding of "old school" CMYK separations and balancing the Cyan against the Magenta/Yellow to maintain neutrality. Still, it's nothing you can't perfect without a bit of practice. Lets give it a try.
 This is a grayscale image from OnSite's color test file. You can download the original target here. We've converted it to U.S. Web Coated (SWOP)v2 CMYK space and have set a few color eyedropper points on the image.
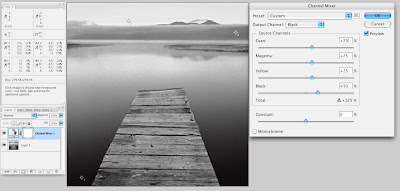
 Notice there is a significant amount of color inks (CMY) creating the image. What we want to do is push most of the color inks OUT of the image and place it into the black ink channel. We'll use Channel Mixer to do this.

Now, go to the Cyan, Magenta, Yellow channels and reduce their values from 100% to approx 50%. Then, go to the Black channel and reduce the black to about 60% and increase the Cyan, Magenta, Yellow to about 25%. Keep an eye on your info pallet to watch the CMYK levels before/after.
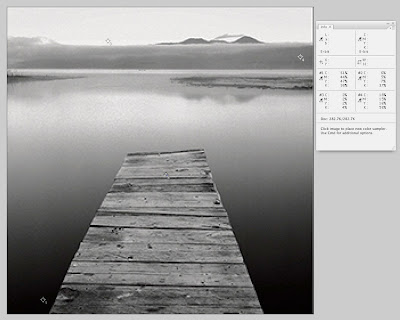
Notice that the image on screen looks nearly identical to the original separation (click the preview check box to see this). Notice that we are re-creating a grayscale image within the black channel and leaving some important color information. Doing this technique will reduce your total ink density quite dramatically, however it's the only way to ensure that color casts on press will be eliminated or drastically reduced.
Unfortunately, there is no magic bullet for the Richard Free Technique. Some images will fall into place naturally without shadow detail loss while other images will require a lot of tweaking, masking and other modifications. However, there is one more technique that does make this very simple.
The Uber-K separation --
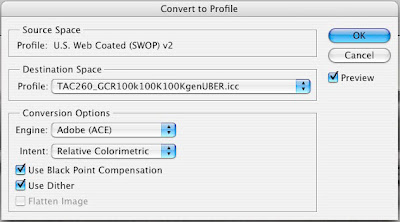
The first thing we need to do is to download the Uber-K profile and load it into your ColorSync folder so PhotoShop has access to it. Once you load the profile, simply go the Edit menu in PhotoShop and select "Convert To Profile...". Select the Profile named "TAC260_GCR100k100K00genUBER.icc" in the pop-up menu and hit OK.
You're done! Examine the info palette and color channels.
The profile you downloaded, "TAC260_GCR100k100K00genUBER.icc", was made in 2006 in an attempt to automate the Richard Free Technique and I think it was pretty successful. Though this is not exactly proper use of an ICC color profile, it is a clever way to bypass neutrality issues on press as well as inkjet printers! The data the profile was generated from was a Kodak Approval XP2 running the D2222 media set.


Now, go to the Cyan, Magenta, Yellow channels and reduce their values from 100% to approx 50%. Then, go to the Black channel and reduce the black to about 60% and increase the Cyan, Magenta, Yellow to about 25%. Keep an eye on your info pallet to watch the CMYK levels before/after.
Notice that the image on screen looks nearly identical to the original separation (click the preview check box to see this). Notice that we are re-creating a grayscale image within the black channel and leaving some important color information. Doing this technique will reduce your total ink density quite dramatically, however it's the only way to ensure that color casts on press will be eliminated or drastically reduced.

Unfortunately, there is no magic bullet for the Richard Free Technique. Some images will fall into place naturally without shadow detail loss while other images will require a lot of tweaking, masking and other modifications. However, there is one more technique that does make this very simple.
The Uber-K separation --
The first thing we need to do is to download the Uber-K profile and load it into your ColorSync folder so PhotoShop has access to it. Once you load the profile, simply go the Edit menu in PhotoShop and select "Convert To Profile...". Select the Profile named "TAC260_GCR100k100K00genUBER.icc" in the pop-up menu and hit OK.

You're done! Examine the info palette and color channels.

The profile you downloaded, "TAC260_GCR100k100K00genUBER.icc", was made in 2006 in an attempt to automate the Richard Free Technique and I think it was pretty successful. Though this is not exactly proper use of an ICC color profile, it is a clever way to bypass neutrality issues on press as well as inkjet printers! The data the profile was generated from was a Kodak Approval XP2 running the D2222 media set.
Summary --
We've shown you three different ways to create perfectly neutral CMYK images. The last two techniques are designed to minimize the effect of color drift on press. Lets show you why you may want to use the Richard Free Technique or the UberK separation for your projects. Like we said before, if the world were perfect, neutral CMYK images would be as easy as coping a grayscale image into the CMYK photoshop document but since color tends to drift on press, the Free & UberK methods are meant to keep some of the richness of 4C neutrals but minimize color casts should they occur.
We've shown you three different ways to create perfectly neutral CMYK images. The last two techniques are designed to minimize the effect of color drift on press. Lets show you why you may want to use the Richard Free Technique or the UberK separation for your projects. Like we said before, if the world were perfect, neutral CMYK images would be as easy as coping a grayscale image into the CMYK photoshop document but since color tends to drift on press, the Free & UberK methods are meant to keep some of the richness of 4C neutrals but minimize color casts should they occur.


1 comment:
So if one was to hand off an Uber-K'd photo blindly off to a printer, my guess that the safest thing to do would be to take the profile off after the conversion. Otherwise, it's possible that someone that is pretty confused about the whole ICC thing could screw things up pretty badly when they find this 'strange' tag still on the photo.
But an untagged image in CMYK would at worst get a generic tag stuck on. I don't think the CMYK mixes would get messed with much.
The separations looked beautiful using the profile. Hopefully it prints that way, too. Thanks for your post.
Post a Comment